You may be thinking “Is surf wax really that important?” The answer is yes. Learning how to wax a surfboard properly can be critical to your surfing experience. There is a variety of surf waxes on the market and each is manufactured for different riding conditions. This means that you need to find what works best for you, as well as the location you will be surfing.
The Purpose of Surf Wax
Simply put, surf wax is meant to help maintain grip on your surfboard. Without it, you’ll find the board nearly impossible to stand on when wet. It is important to find the right balance of traction and stickiness, so that you can maintain optimal balance throughout your surfing experience.
Different Types of Wax
Knowing the difference between sticky wax and more traditional waxes could make or break your surfing experience. Traditional waxes are the most popular. They are typically used when applying base coats and top coats. You can use a stickier wax if you need additional traction. It is important to note that stickier waxes shouldn’t be applied across your entire board. They only need to be applied to the area where you will put your feet. As with any wax, applying to much will do more harm than good and can make the surface to sticky to actually work.
Importance of Wax Temperature
If you’re new to surfing, you might not know that different water temperatures require different waxes. The water temperature will depend on the location you are surfing at and the season you are surfing in.
For those of you living in more tropical places such as Hawaii or Australia, a higher temperature product is necessary. For those surfing in cooler climates like Northern California, a cooler temperature product is required. As with all products, follow the manufacturer’s instructions for the best results.
Tropical
A tropical wax is required for maximum traction if you are surfing in waters 75 degrees and above. Tropical wax is generally harder than other wax temperatures and is designed to withstand hotter temperatures. This means they won’t melt away when it is hot outside, or when hit with direct sunlight.
Warm
Warm water wax is required if you are surfing in water with temperatures between 58 and 75 degrees. These aren’t as resistant to hot temperatures and could affect your traction if used in waters that are too warm.
Cool
Cool water wax is recommended for use in waters between 58 to 68 degrees. As you probably guessed, cool water wax works well to maintain traction in cooler temperatures, but wont hold up very well when temperatures begin to rise.
Cold
If you plan on surfing in temperatures of 60 degrees of below, a cold-water wax is recommended. It is also recommended to wear a wetsuit. Cold-water wax is designed to help you keep maximum traction on your board in colder waters.
As a note, you must be careful when storing this wax because it will melt in higher temperatures. Do not leave in your car or in direct sunlight. Even though the temperature may be colder outside, it can still melt in these conditions. Many surfers agree the best place to store cold-water wax is in your refrigerator.
If you can’t store it in higher temperatures, you shouldn’t use it in warmer climates as it won’t be able to withstand the heat.
When to Apply
Many beginners don’t realize that you must apply two layers of wax to your board. These layers consist of the base coat and the top coat. These two layers serve different purposes, but are necessary to achieve maximum performance.
It is a good idea to apply a light top coating of wax every time you go surfing. You can apply less frequently, such as every other time if you find this works better through trial and error.
Eventually, you will need to scrape off both the top and base coat and start new. This is necessary when you feel yourself losing traction with the board. Unfortunately, knowing the exact time frame between waxes also takes some trial and error. It can be helpful to keep track of the length and number of surf sessions, as well as the type of wax you use. Check out this post for more information on how to remove wax from a surfboard.
Applying the Base Coat
The base coat is the first layer of wax that you will apply to your surfboard. It is also the most important. Generally, the base coat lasts longer because it is typically a harder wax. The harder wax also means that it will be more difficult to apply.
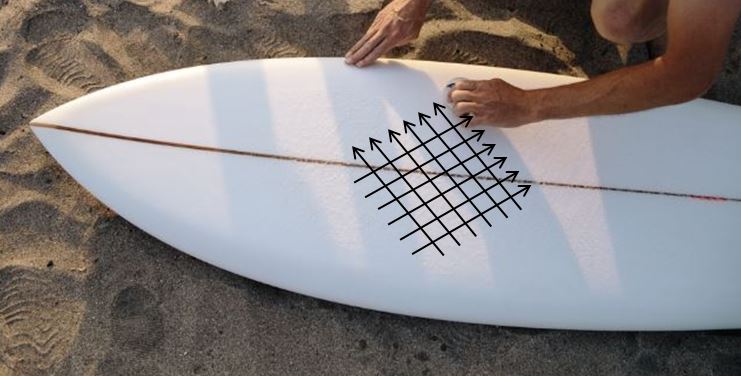
Crosshatching is the most popular application pattern and you should use it when applying the base coat to your board. You will want to start with diagonal patterns going in one direction down the length of the riding surface. Your lines should be within an inch of each other. Once you have completely covered the surface, make more diagonal lines going in the opposite direction until you have formed a crosshatch pattern.
This pattern will prove useful when applying your top coat as it helps form small bumps on your board that add traction when you surf.
As previously stated above, it is important that you use a wax that is designed for your specific surfing needs. Keep in mind the level of stickiness, as well as the temperature threshold.
Applying the Top Coat
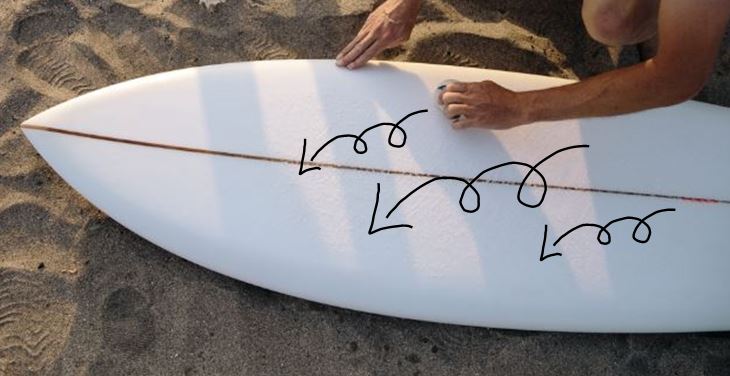
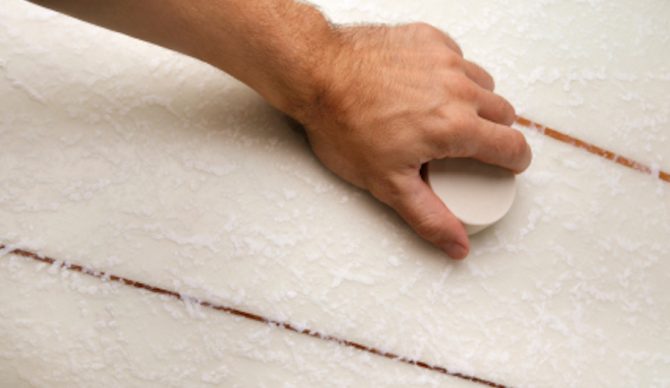
The top coat is the layer of wax that you apply on top of your foundation or base coat. Begin by rubbing your wax in circular motions on top of the crosshatch design. In general, you want your circles to be small. If you apply too broadly, you may find that you won’t have enough traction as you ride. Don’t stop rubbing until you see prominently raised bumps across the riding area of your board. Once these appear, you are done and ready to ride.
Make sure you don’t oversaturate your board during this step. Keep in mind that if you use too much wax, you will actually be making it harder to surf. Don’t worry if you don’t get it right the first time. With some trial and error, you will eventually get the hang of it.
Don’t Press to Hard
When learning how to wax a surfboard, it is crucial that you apply the right pressure. Pressing too hard can lead to over-application. Applying too much wax can make your board more slippery and increase the chance you will fall off.
On the same note, you don’t want to apply the wax to softly, either. The pressure at which you should apply will take some trial and error before you get it perfect. It is generally a good rule of thumb to start with a medium pressure and adjust as necessary.
Make Sure your Wax Forms Bumps
If your board doesn’t have prominent bumps about 2 millimeters high running across the riding area after you’ve finished waxing, you’re not actually finished. Without these bumps, it’s likely that you won’t have enough traction while surfing. If you follow the designs and patterns above, you shouldn’t have any problem forming the wax bumps. Just remember to wax the correct area and use the right amount of pressure or you may find yourself having to start over.
You Don’t Have to Wax a Foam Board
Many don’t realize that you do not need to wax a foam board. Most foam boards aren’t very slippery to begin with, so waxing is unnecessary. Some people like to wax their foam boards, as they like the extra traction. There is no harm in doing this, but it usually isn’t necessary.
Try out Different Types of Wax
Finally, don’t forget to play around with different types of wax. Every surfer has his or her favorite type of wax, and it likely won’t be any different for you. When learning how to wax a surfboard, it may take a while for you to find the a wax that provides the right traction and balance, but don’t give up. You are sure to find a type and brand that suits your needs.


